June 17, 1775
The British marched up Breed's Hill three times. They took it on the third. It cost them over a thousand men, and when General Thomas Gage sat down to write his official dispatch to London, he was explaining something he had not expected: the colonial militia had held their positions, absorbed two full assaults, and only retreated when their powder ran out.
"The rebels are not the despicable rabble too many have supposed them to be."
General Thomas Gage, dispatch to the Earl of Dartmouth, June 25, 1775It was the second major engagement of the American Revolution, fought two months after Lexington and Concord, before Washington had been named commander-in-chief or the Continental Army formed: Massachusetts militiamen holding the line on their own, a dirt redoubt on a peninsula north of Boston, British regulars in scarlet marching uphill toward them through June heat.
Someone was watching from across the water. His name was Bernard Romans.
The Cartographer
Romans was a cartographer who had spent years mapping the Gulf Coast and the Florida interior for the British Crown, his trade being the measurement of distance, elevation, and the relationship between landforms and navigable water. By 1775 he had settled in the northern colonies, and on June 17 he was at Charlestown Neck, positioned to watch the battle as it unfolded across the water.
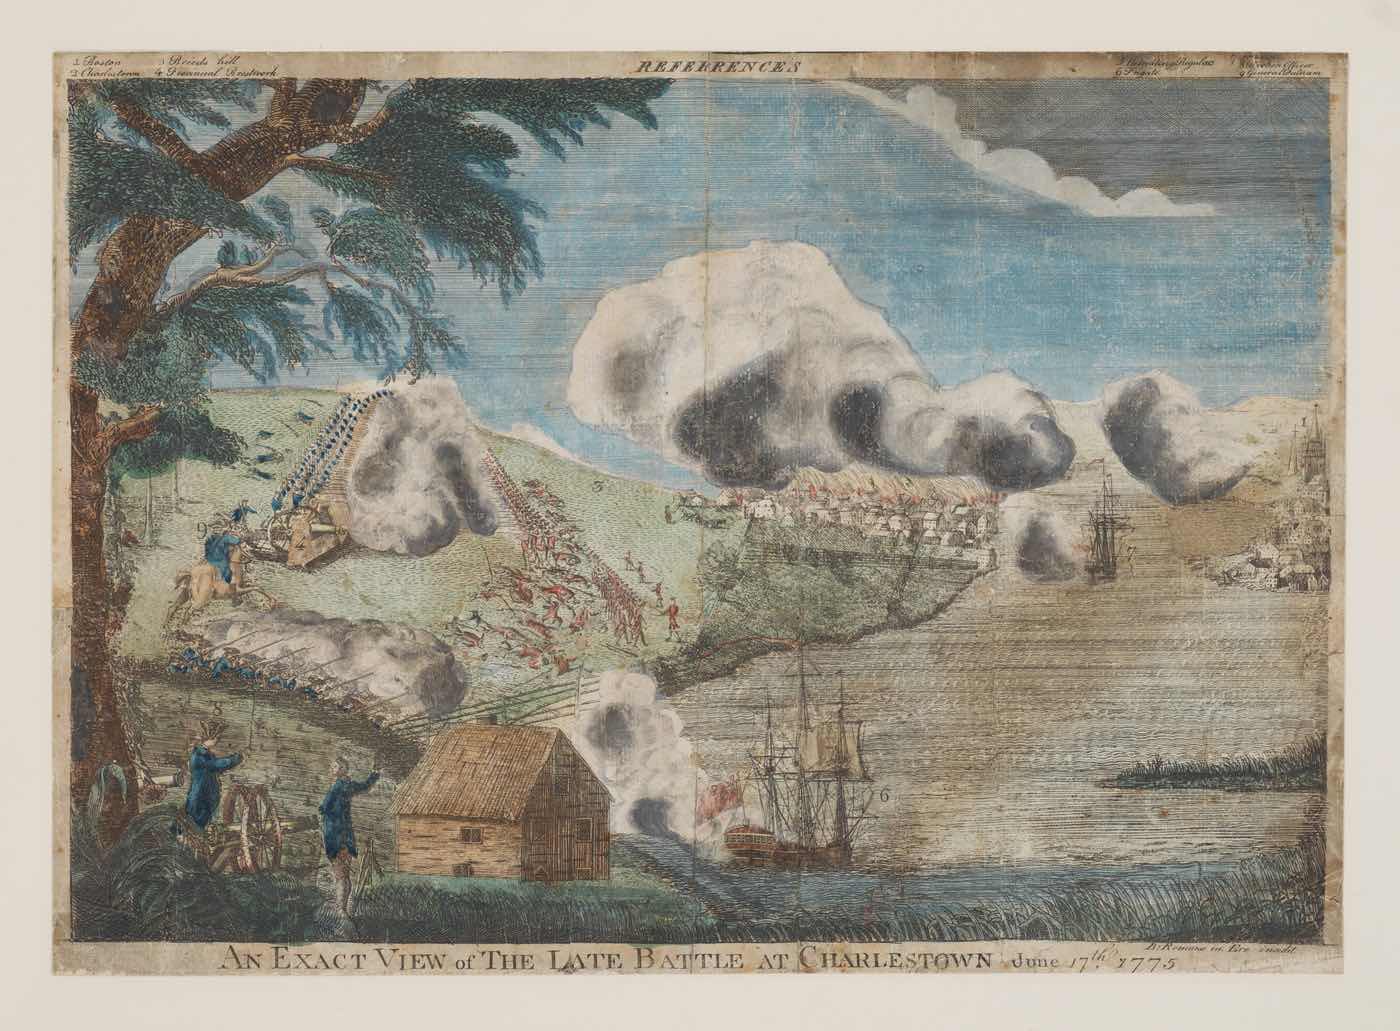
Romans was a surveyor, not a battle artist, a distinction that matters: battle paintings commemorate; this engraving records what the surveyor actually saw, which is why it outlasts most commemorative illustrations of the same events.
Within weeks of the battle, his field sketches had become a copper-plate engraving published in Philadelphia: An Exact View of the Late Battle at Charlestown, June 17th 1775. It was the first printed image of a Revolutionary War battle to reach the general public; news of the engagement had traveled fast, by foot and rider and coastal ship, and the print moved more slowly, working through the colonial press in the months that followed.
Breed's Hill, Called Bunker Hill
Look at the print. The Charlestown Peninsula is shown in profile from the north, stretched across the picture plane in the low horizontal format Romans would have used for any stretch of coastline requiring military assessment. Bunker Hill rises on the left, Breed's Hill on the right, lower and nearer the water. The town of Charlestown burns in the center; the smoke is rendered in fine stippled columns, each one curved and pulled upward toward a blank sky. British warships occupy the harbor in the foreground, their masts picked out in the thin parallel lines of maritime engraving convention, and the redoubt on Breed's Hill is small but distinct at the crest of the slope, a rectangular mark scored into the copper.
The British had fired Charlestown to clear their flanks and deny the colonists cover, heating cannonballs in shipboard furnaces and lobbing them into the wooden buildings. The town was already burning when the assault began, and the smoke columns in Romans's engraving are not incidental detail; they are the tactical context.
Romans's cartographic training shows in how he handles the ground: the open hillside between the harbor and the redoubt is rendered in careful parallel strokes, the elevation changes legible in the spacing of the lines, so that you can see exactly what the British had to cross and why it cost them what it did; the narrow neck connecting the peninsula to the mainland, the only escape route, is visible at the top right of the composition.
The colonial commanders had planned to fortify Bunker Hill, the higher elevation, but by confusion or deliberate change of plan (the historical record does not settle the question) they ended up on Breed's Hill instead. The British, looking across from Boston, called their objective "Bunker Hill" in their dispatches, and the name settled into history before anyone corrected it.
A Catastrophe for the Side That Won
The British carried the redoubt on the third assault, colonial powder exhausted; the engagement had lasted less than three hours. British casualties, killed and wounded, exceeded 1,054 out of roughly 2,400 men engaged; American losses were perhaps 400 to 450, and General William Howe, who had personally led the assault and watched his staff officers fall around him, was left commanding a captured hill with a problem he had not begun the day with: the knowledge that colonial militiamen in fixed positions would cost the Crown whatever it took to dislodge them.
Gage's strategy did not survive the battle; he was replaced by Howe in October, and the war was already becoming something different before anyone had named it.
The Man Who Shot Pitcairn
Among the defenders in the redoubt was a formerly enslaved man from Framingham, Massachusetts, named Peter Salem, who had been freed by his enslaver to enlist in the colonial militia, a transaction that appears in the records without comment. Salem had fought at Lexington in April, and at Bunker Hill he was in the redoubt when Major John Pitcairn, the British marine officer who had commanded the Redcoat advance at Lexington, crested the parapet in the third assault. Pitcairn was shot, and contemporary accounts credit Salem with it, though the evidence is credible rather than conclusive.
Salem was not the only Black soldier in the redoubt that day. Among the others was Salem Poor, a free man from Andover, who fought with sufficient distinction that fourteen colonial officers signed a joint commendation addressed to the General Court of Massachusetts, asking that he receive recognition; the language of the petition is precise, describing him simply as a brave and gallant soldier. The General Court did not act on it, and Salem Poor continued through Valley Forge and into the later years of the war.
The redoubt visible in Romans's engraving, that small rectangular mark at the crest of the slope, held men like Salem and Poor alongside Prescott, who commanded it, and Warren, who was killed when the British broke through.
Copper Plate and Field Sketches
Romans produced the engraving in haste, and the lines show it: the perspective is slightly compressed, as you would expect from field sketches taken at distance across open water by someone working from observation rather than from a stable position with surveying instruments. The copper plate was cut and distribution arranged without delay, because news of a battle carried the same commercial urgency in 1775 as it does now.
A pirated version of his design appeared in the Pennsylvania Magazine in September 1775, before his own folio was available; Romans advertised his superior original in the Pennsylvania Gazette that November, distinguishing his plate from the copy and inviting the public to judge for themselves.
The Metropolitan Museum of Art holds the original engraving, a public domain work; the foxing at the margins and the uneven ink impression on the surviving copy are part of what this document is: a record made quickly, from observation, by someone who was close enough to see the smoke columns rising.
The Numbers: A Tactical Comparison
The engagement lasted less than three hours. The disparity between British casualties and American losses tells the tactical story more plainly than any narrative can.
| British Forces | American Forces | |
|---|---|---|
| Troops Engaged | ~2,400 | ~1,500 |
| Commanding Officer | Major General William Howe | Colonel William Prescott |
| Killed | 226 | 115-140 |
| Wounded | 828 | 305 |
| Captured | 0 | 30 |
| Total Casualties | 1,054 (44%) | 450-475 (30%) |
| Outcome | Pyrrhic victory | Tactical defeat, strategic validation |
Sources: Philbrick, Bunker Hill (2013); Fischer, Paul Revere's Ride (1994); Gage's dispatch to Dartmouth, June 25, 1775.
The British lost nearly half their attacking force. Among the dead were Major Pitcairn and Dr. Joseph Warren, president of the Massachusetts Provincial Congress, who had joined the redoubt as a volunteer. Howe lost every member of his personal staff. The 44% casualty rate was the highest the British Army would sustain in any single engagement of the entire war.